Auto Photo Albums by castlecode
Thank you for purchasing this plugin. If you have any questions that are beyond the scope of this help file, please feel free to email via my user page contact form here. Thank you!
plugin_only.html, that file/page contains ONLY the code needed for the plugin! You can base on that file to start installing your gallery!
Including files
These are all the files you need to import in your .html page so the plugin can work.
<!-- Auto Photo Albums CSS files -->
<link rel="stylesheet" href="plugin/components/Font Awesome/css/font-awesome.min.css"> <!-- only if you use Font Awesome -->
<link rel="stylesheet" href="plugin/components/Fancybox/jquery.fancybox.min.css"> <!-- only if you use fancybox -->
<link rel="stylesheet" href="plugin/components/Media Boxes/css/mediaBoxes.css">
<link rel="stylesheet" href="plugin/autoPhotoAlbums.css">

<!-- jQuery 1.8+ -->
<script src="plugin/components/jQuery/jquery-1.11.3.min.js"></script>

<!-- Auto Photo Albums JS files. -->
<script src="plugin/components/Isotope/jquery.isotope.min.js"></script>
<script src="plugin/components/imagesLoaded/jquery.imagesLoaded.min.js"></script>
<script src="plugin/components/Transit/jquery.transit.min.js"></script>
<script src="plugin/components/jQuery Easing/jquery.easing.js"></script>
<script src="plugin/components/jQuery Visible/jquery.visible.min.js"></script>
<script src="plugin/components/Modernizr/modernizr.custom.min.js"></script>
<script src="plugin/components/Fancybox/jquery.fancybox.min.js"></script> <!-- only if you use Fancybox -->
<script src="plugin/components/Media Boxes/js/jquery.mediaBoxes.dropdown.js"></script>
<script src="plugin/components/Media Boxes/js/jquery.mediaBoxes.js"></script>
<script src="plugin/jquery.autoPhotoAlbums.js"></script>
It’s not required, but I recommend placing the CSS files in <head> and the JavaScript files and the JS initialization code in the footer of your site (before the closing </body> tag).
If you already have jquery.js on your site, don’t include it a second time.
HTML
Here is the basic HTML for the Auto Photo Albums. Place it anywhere in your page! The plugin will automatically take care of filling that div with the images for the gallery
<div id="grid"></div>
PHP File
In the example folder you'll find a file named "auto_photo_albums.php" this file is the one that reads the images from its folder and that's why you need PHP since it is a PHP script file
It is very important that you place this php file in the same directory where your HTML/PHP page is, otherwise the JS plugin will not be able to find it
Initializing
Once you got the HTML markup in your site you need to initialize the plugin in Javascript.
You need to take the id from the previous step in the HTML (In the example above would be: id="grid") and use it for the initialization.
<script>

    $('#grid').autoPhotoAlbums();

</script>
And here is where you can pass all the options available. For example:
<script>

    $('#grid').autoPhotoAlbums({
        directory       : 'galleries/gallery',
        configFile      : '',
    });

</script>
You can see all the options available here
Drag & Drop images into your folder
No albums, only images
If you don't want any album only images then you can just drag and drop your images in the gallery folder!
The folder will look like this:
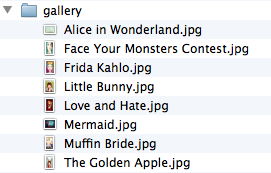
The plugin will take care of reading them, just refresh your page and you will see this images automatically added to the gallery!
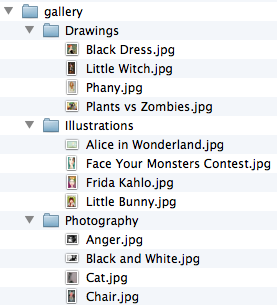
With albums
If you want albums then inside the "gallery" folder you need to create subfolders that will be the albums of your gallery (e.g. Illustrations, Photography, Drawings, etc.) and inside those folders you can place the images you want. And that's it, refresh the page.
The caption box that shows when you move the mouse over an image will be the name of the image!
The directory will look like this:
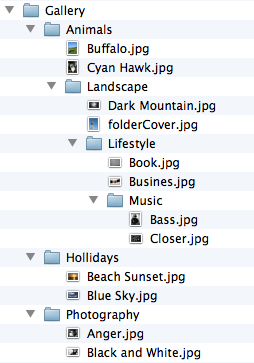
Without limit
Is not over, you can keep creating folders of images inside a folder inside a folder inside a folder and the plugin will read them all and create a navigation breadcrumb at the top so you can go back.
The directory will look like this:
Thumbnails
Now is time to add some thumbnails to each image.
To improve performance you can add thumbnails to the gallery.
The thumbnails will be used in the grid and the original images in the lightbox (when you click on a thumbnail).
To make a thumbnail just add a folder named "thumbnails" and inside place the thumbnails of your images, the thumbnail must have the exact same name of the original image so the plugin can recognize it.
For example if you wish to add a thumbnail for an image named "Black Dress.jpg" you will do it like this:
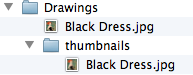
You don't need to add a thumbnail for each image, just for the ones you like.
Config File (.txt)
You can place a .txt file inside each of your folders/albums so you can add/edit some extra information about your images or albums, for example, maybe you wish to add a youtube video for some of your images or some tags or you can even add some extra description to your albums.
Add extra information to your images
Place a config.txt file inside your folder/album, as follows:
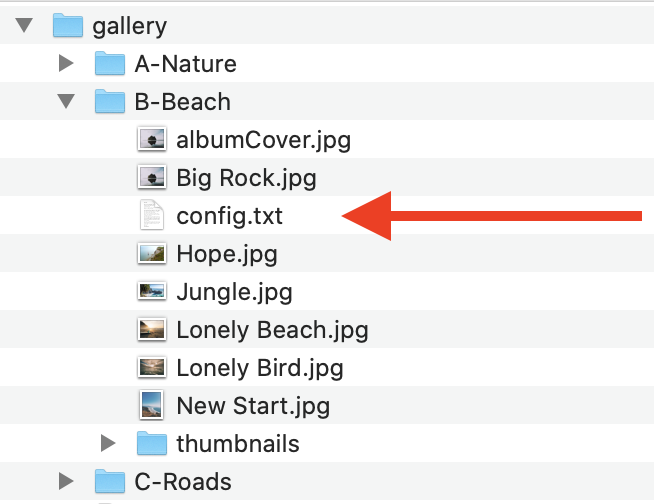
Then open it in some text editor and add the following text
image           => Big Rock.jpg
link            => https://codecanyon.net/item/auto-photo-albums-multi-level-image-grid/5319229
popup_src       => https://www.youtube.com/watch?v=5guMumPFBag

image           => Hope.jpg
popup_src       => https://www.youtube.com/watch?v=5guMumPFBag

image           => Lonely Beach.jpg
popup_src       => https://www.youtube.com/watch?v=UrIbxk7idYA
As you can see you need to specify the name of the image (including its extension) and below you can add some extra variables to each image, like link, popup_src, ratio, description, etc
These are the default variables the plugin uses so you can modify them if needed, also you can add your own variables and add them in your itemTemplate JS option:
image           => Autumnn.jpg
link            => https://codecanyon.net/?param=param
name            => My Image Name
thumb_src       => thumbnails/Autumnn.jpg
ratio           => 1x1
popup_src       => https://www.youtube.com/watch?v=5guMumPFBag
popup_type      => iframe
Add extra information to your albums
Place a config.txt file inside your folder/album, as follows:
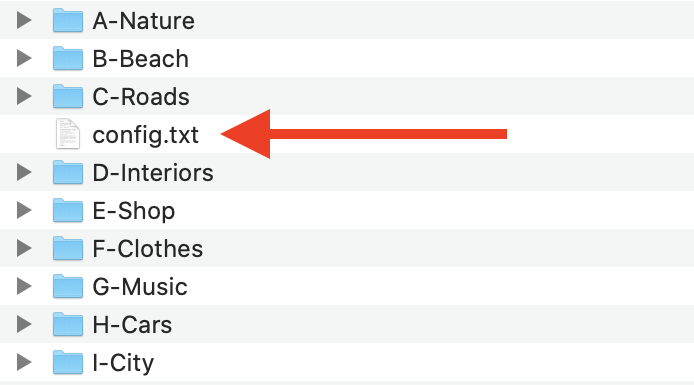
Then open it in some text editor and add the following text
album           => A-Nature
description     => Lorem ipsum dolor sit amet.

album           => B-Beach
description     => Lorem ipsum dolor sit amet.

album           => C-Roads
description     => Lorem ipsum dolor sit amet.
As you can see you need to specify the name of your album and below you can add some extra variables to each image, like name, image_count, album_count, album_cover, etc
Make sure the variables are used in your albumTemplate JS option. For example you can check the pinterest_style.html example in order to see how the {{description}} variable is added to the albumTemplate JS option.
Things to notice
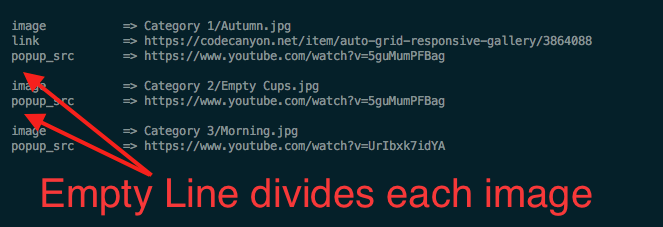
The "=>" is important since the plugin will use it to divide the variable from the value.
Also the empty lines between images is very important so the plugin can differentiate between several images, you can use 1 or 2 or 3 empty lines between each image! as follows:
Options
Here you can see all the JS options available for the auto photo albums.
| Option | Type | Default | Description |
|---|---|---|---|
directory |
string | 'galleries/gallery' | The location where your images are |
ignoreAlbums |
JS array | [] | An array of albums/folders that will be ignored by the plugin |
configFile |
string | 'config.txt' | The name of the file that will be used to add extra information to your images and albums |
nameDivider |
string | '-' | In the name, everything before this characters will not be shown |
linkTarget |
string | 'new_window' | The link target, either 'new_window' or 'self' |
limit |
boolean or integer | false | If you wish to limit the number of images to be shown then change false to some number, i.e 10 or 20 |
breadcrumb |
boolean | true | Show the breadcrumb |
breadcrumbHome |
string | 'Home' | The name of the first item in the breadcrumb |
deeplinkingOnAlbums |
boolean | true | Enable deeplinking when you navigate through your albums |
scrollTop |
boolean | true | When you open an album the browser will scroll to the top of that album (so you can see it from the start) |
scrollTopSpeed |
integer | 200 | The speed of the animation that will scroll to the top |
thumbnailsOrder |
string | 'byName' | You can use any of these options: 'byDate', 'byDateReverse', 'byName', 'byNameReverse', 'random' |
albumsFirst |
boolean | true | Show first the albums then the thumbnails |
globalAlbumRatio |
boolean or string | false | If you want to specify a global ratio for all your albums. Change false to something like: '1x1' or '255x150' |
globalThumbRatio |
boolean or string | false | If you want to specify a global ratio for all your thumbnails. Change false to something like: '1x1' or '255x150' |
search |
boolean | true | Activate (true) or Deactivate (false) the search input field |
searchWord |
string | 'search' | The serch text placeholder in the input text |
albumTemplate |
string | You can change the template of the albums | |
itemTemplate |
string | You can change the template of the thumbnails | |
|
GRID OPTIONS
|
|||
boxesToLoadStart |
number | 8 | The number of boxes to load when it first loads the grid |
boxesToLoad |
number | 4 | The number of boxes to load when you click the load more button or when the "lazzy load" mode is triggered |
lazyLoad |
boolean | true | When you reach the bottom of the grid the plugin will try to load more media boxes (The bottom of the grid must hit the bottom of your browser window) |
horizontalSpaceBetweenBoxes |
number | 15 | The horizontal space between media boxes |
verticalSpaceBetweenBoxes |
number | 15 | The vertical space between media boxes |
columnWidth |
string or number | 'auto' | The width of each column, if you set it to 'auto' it will use the columns option instead |
columns |
number | 4 | This will only work if you set the columnWidth to 'auto' and it is the number of columns you wish to display in the grid so it can adapt to its container automatically |
resolutions |
array | click me |
Here you define the columnWidth, the columns, the horizontalSpaceBetweenBoxes and the verticalSpaceBetweenBoxes for different resolutions, for example if for mobile resolutions (like phones) you want to show only 1 column of media boxes this is the place to configure it. You can have as many resolutions as you want or have none
I want an example! |
waitUntilThumbWithRatioLoads |
boolean | true | When the thumbnails got the ratio specified, if it's set to true it will wait until the thumbnail is loaded (showing a progress wheel) and then show the thumb, if not you will see the progress as it gets loaded |
waitForAllThumbsNoMatterWhat |
boolean | false | Even if the thumbnails got the ratio specified wait until all of them are loaded in order to show the grid layout and the content |
thumbnailOverlay |
boolean | true | Show the thumbnail overlay? |
overlayEffect |
string | 'fade' | The overlay effect All the overlay effects! |
overlaySpeed |
number | 200 | The speed of the overlay effect |
overlayEasing |
string | 'default' | The easing of the overlay effect All the easing effects! |
showOnlyLoadedBoxesInPopup |
boolean | false |
In the popup show only the boxes that are loaded in the grid. It needs to be set to false for deeplinking.
|
deepLinkingOnPopup |
boolean | true |
Activate deep linking for the popup, for a correct functionality you need to set to false the option showOnlyLoadedBoxesInPopup and also set an id to the grid container, for example id="grid".
|
deepLinkingOnSearch |
boolean | false |
Activate deep linking for the search, for a correct functionality you need to set to false the option showOnlyLoadedBoxesInPopup and also set an id to the grid container, for example id="grid".
|
LoadingWord |
string | 'Loading...' | The loading word |
loadMoreWord |
string | 'Load More' | The load more word |
noMoreEntriesWord |
string | 'No More Entries' | The no more entries word |
popup |
string | 'fancybox' |
Which popup you are going to use, either 'fancybox' or 'magnificpopup'
|
magnificpopup |
array | check options below | The options you can use when using Magnific Popup |
fancybox |
array | check options below | The options you can use when using Fancybox |
You can pass all the options to the autoPhotoAlbums JS function like this (these are the default values)
<script>

$('#grid').autoPhotoAlbums({
    directory           : 'galleries/gallery',
    directoryURL        : '',
    ignoreAlbums        : [],
    configFile          : 'config.txt',

    nameDivider         : '-', // In the name, everything before this characters will not be shown
    linkTarget          : 'new_window', // 'new_window' or 'self'
    limit               : false,
    breadcrumb          : true,
    breadcrumbHome      : 'Home',
    deeplinkingOnAlbums : true,
    scrollTop           : true,
    scrollTopSpeed      : 200,

    /* Thumbnails options */

    thumbnailsOrder     : 'byName', // byDate, byDateReverse, byName, byNameReverse, random
    albumsFirst         : true,
    globalAlbumRatio    : '200x200',
    globalThumbRatio    : false,

    /* search options */

    search              : true,
    searchWord          : 'search',

    /* Template options */

    albumTemplate        :  ' <div class="media-box-image"> '+
                                ' <div data-thumbnail="{{album_cover}}" {{ratio}} data-title="{{name}}" data-alt="{{name}}"></div> '+

                                ' <div class="media-box-album"> '+
                                    ' <div class="media-box-album-name">{{name}}</div> '+
                                    ' <div class="media-box-album-count"> '+
                                        ' {{image_count}} images <span hide_if_empty="{{album_count}}">and {{album_count}} album(s)</span> '+
                                    ' </div> '+
                                ' </div> '+
                            ' </div> ',

    itemTemplate        :   ' <div class="media-box-image mb-open-popup" {{link}} data-src="{{popup_src}}" data-title="{{name}}" data-type="{{popup_type}}"> '+
                                ' <div data-thumbnail="{{thumb_src}}" {{ratio}} data-title="{{name}}" data-alt="{{name}}"></div> '+

                                ' <div class="thumbnail-overlay"> '+

                                    ' <div class="thumbnail-overlay-animated" data-from="top"> '+
                                        ' <div class="thumbnail-overlay-title">{{name}}</div> '+
                                    ' </div> '+

                                ' </div> '+
                            ' </div>',

    /* Media Boxes options */

    grid : {
        boxesToLoadStart                : 9,
        boxesToLoad                     : 9,
        lazyLoad                        : true,
        lazyLoadInLoadMoreView          : false,
        horizontalSpaceBetweenBoxes     : 30,
        verticalSpaceBetweenBoxes       : 30,
        columnWidth                     : 'auto',
        columns                         : 3,
        resolutions                     :   [
            {
                maxWidth: 960,
                columnWidth: 'auto',
                columns: 3,
            },
            {
                maxWidth: 650,
                columnWidth: 'auto',
                columns: 2,
                horizontalSpaceBetweenBoxes: 10,
                verticalSpaceBetweenBoxes: 10,
            },
            {
                maxWidth: 450,
                columnWidth: 'auto',
                columns: 1,
                horizontalSpaceBetweenBoxes: 10,
                verticalSpaceBetweenBoxes: 10,
            },
        ],
        waitUntilThumbWithRatioLoads    : true, // When they have dimensions specified
        waitForAllThumbsNoMatterWhat    : false, // Wait for all the thumbnails to load even if they got dimensions specified
        thumbnailOverlay                : true, //Show the overlay on mouse over
        overlayEffect                   : 'fade', // 'push-up', 'push-down', 'push-up-100%', 'push-down-100%', 'reveal-top', 'reveal-bottom', 'reveal-top-100%', 'reveal-bottom-100%', 'direction-aware', 'direction-aware-fade', 'direction-right', 'direction-left', 'direction-top', 'direction-bottom', 'fade'
        overlaySpeed                    : 200,
        overlayEasing                   : 'default',
        showOnlyVisibleBoxesInPopup     : false,
        deepLinkingOnPopup              : true,
        deepLinkingOnSearch             : false,
        LoadingWord                     : 'Loading...',
        loadMoreWord                    : 'Load More',
        noMoreEntriesWord               : 'No More Entries',
        percentage                      : false,
        popup                           : 'fancybox', // fancybox, magnificpopup, none
        magnificpopup                   :   {
            gallery: true,
            alignTop: false,
            preload: [0,2],
        },
        fancybox                        :   {
            loop                : false, // Enable infinite gallery navigation
            margin              : [44, 0], // Space around image, ignored if zoomed-in or viewport smaller than 800px
            keyboard            : true, // Enable keyboard navigation
            arrows              : true, // Should display navigation arrows at the screen edges
            infobar             : false, // Should display infobar (counter and arrows at the top)
            toolbar             : true, // Should display toolbar (buttons at the top)
            buttons             :   [ // What buttons should appear in the top right corner.
                                        'slideShow',
                                        'fullScreen',
                                        'thumbs',
                                        'close'
                                    ],
            idleTime            : 3, // Detect "idle" time in seconds
            protect             : false, // Disable right-click and use simple image protection for images
            animationEffect     : 'zoom', // Open/close animation type, it could be: false, 'zoom', 'fade', 'zoom-in-out'
            animationDuration   : 330, // Duration in ms for open/close animation
            transitionEffect    : 'fade', // it could be: false, 'fade', 'slide', 'circular', 'tube', 'zoom-in-out', 'rotate'
            transitionDuration  : 330, // Duration in ms for transition animation
            slideShow           : { autoStart : false, speed : 4000 }, // slideshow settings
            fullScreen          : { autoStart : false, }, // activate or deactivate fullscreen when open
            thumbs              : { autoStart : false, hideOnClose : true },    // Display thumbnails on opening/closing
            touch               : { vertical : true, momentum : true }, // Allow to drag content
            compensateScrollbar : '.fancybox-compensate-for-scrollbar',
        },
    },
});

</script>
Template
You may have noticed two options named "albumTemplate" and "itemTemplate" in the previous section, in there you can specify the HTML of each album and thumbnail you can add/edit/remove HTML, here's an example template:
itemTemplate :  ' <div class="media-box-image mb-open-popup" {{link}} data-src="{{popup_src}}" data-title="{{name}}" data-type="{{popup_type}}"> '+
                    ' <div data-thumbnail="{{thumb_src}}" {{ratio}} data-title="{{name}}" data-alt="{{name}}"></div> '+

                    ' <div class="thumbnail-overlay"> '+

                        ' <div class="thumbnail-overlay-animated" data-from="top"> '+
                            ' <div class="thumbnail-overlay-title">{{name}}</div> '+
                        ' </div> '+

                    ' </div> '+
                ' </div>',
Each variable is inside double brakets, for example: {{name}} is the name of the image.
here you can also pull variables from the .txt file, for example if you add a variable in the .txt file like this: text => some random text here you can pull that variable in the template like this: {{text}}. The plugin will take care of replacing that variable with what you have specified in the .txt file
' at the start and end of each line and also the + at the end of each line! Because if they are not correctly formated Javascript will throw an error!
Handy Stuff
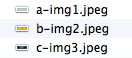
When you order the images 'ByName' and you want to control the order of the images and albums just add a-, b-, etc... at beginning of the name of each image/album (the a-,b-, etc... will not be visible in the gallery):
By default the plugin will choose a random image inside the album and use it as the "album cover" image.
But you can name an image "albumCover" (albumCover.png, albumCover.jpg, etc) and the plugin will use it as the "album cover" image (this image will not be shown in the grid when you open that album).
You can change the default configuration for a specific album
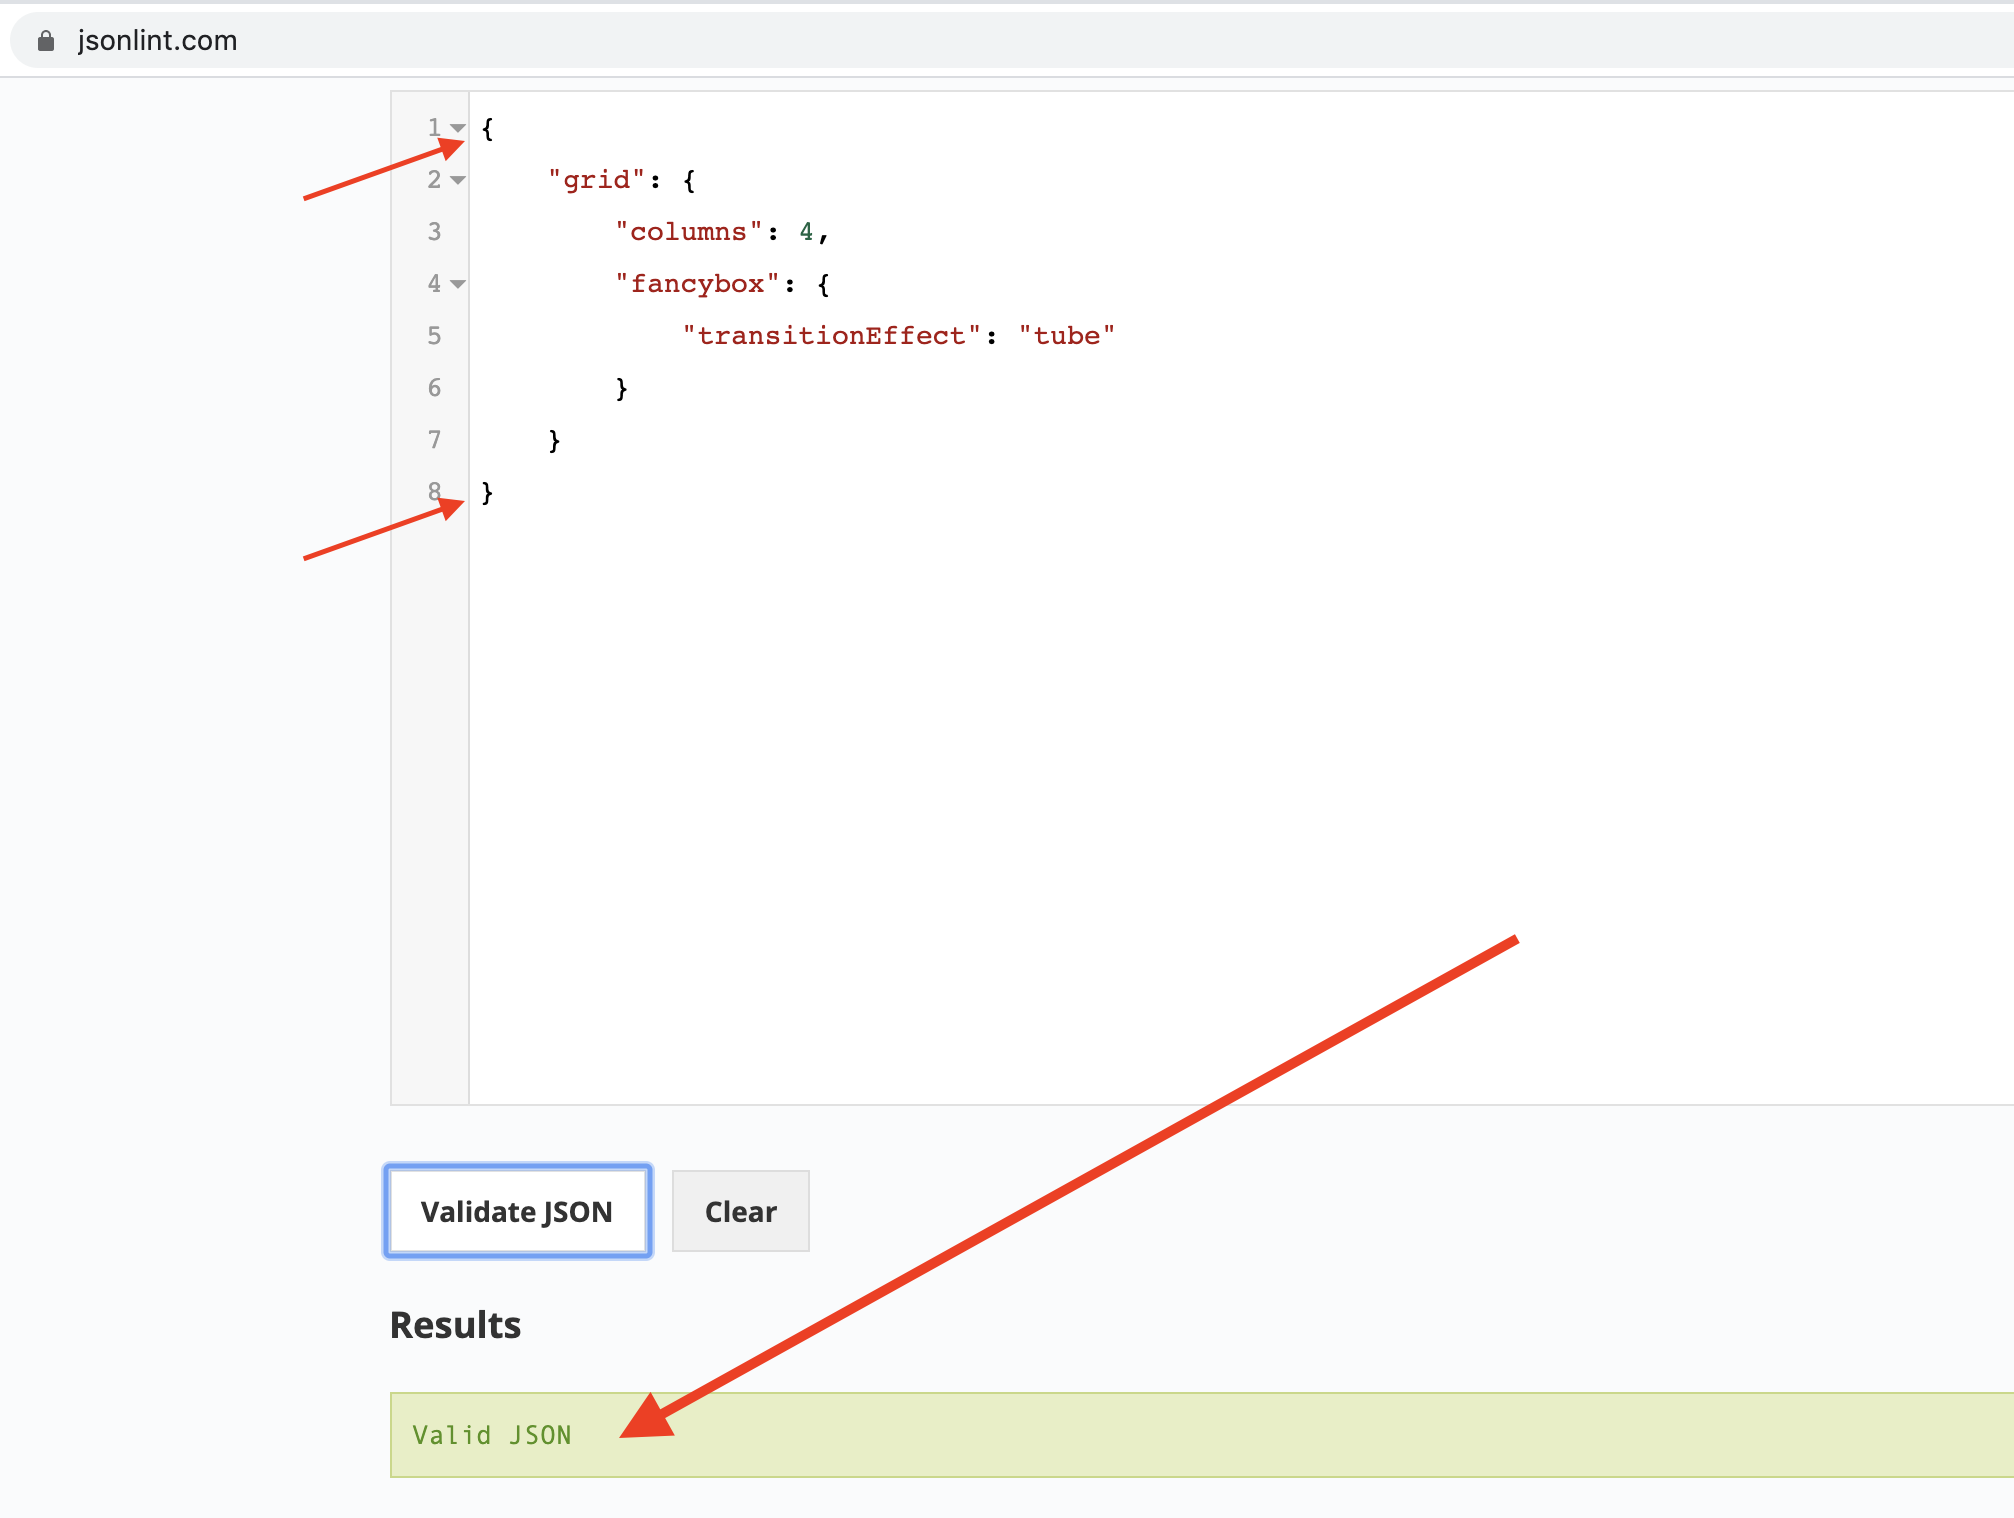
For example: by default the gallery has 3 columns but maybe in a specific album you wish to have 4 columns, then in that album add a file named "settings.txt" and in that file add the new JS settings, something like this:
"grid"          :   {
                        "columns" : 4,
                        "fancybox" : {
                            "transitionEffect" : "tube"
                        }
                    }
You need to be very careful with the JS format, for example all strings must have double quotes (i.e. "grid"), also don't leave an extra comma at the end.
You can validate your JS format here: https://jsonlint.com/ just wrap your settings in a {} and that's it, test it out, for example: